This article explains: some background to our bungalow design, why we had the original mechanical ventilation and heat recovery system installed; why we chose the latest system and our experience with both systems.
Mechanical ventilation and heat recovery System with integral heat pump
John Perry | Redoak
Introduction
Twenty one years ago, our bungalow was built with a high standard of insulation and with a built in mechanical ventilation and heat recovery system. The system served us well for 20 years, but 18 months ago, I decided to replace it with a new model with an integral heat pump.
This article explains: some background to our bungalow design, why we had the original mechanical ventilation and heat recovery system installed; why we chose the latest system and our experience with both systems.
Why Mechanical Ventilation and Heat recovery?
We need to regress back to our previous property which was a new-build 4-bedroom detached house with Georgian windows, single glazing and gas fired central heating using micro bore piping. This was a new build, but we soon found that in cold winters that condensation formed on the windows and in very cold weather, the condensation froze. We fitted secondary double glazing, and while this helped, we still needed to keep bathroom windows open when showering, and the condensation and ventilation issues never went away.
Also, being on the South Coast of the UK, the water was hard, and eventually we started having problems with the central heating pump and the micro bore piping. We had always planned on moving, and decided in 1990 that the time had come to move to another new property, but designed specifically to be comfortable, cheap to run and energy efficient, while at the same time we wanted solutions to ventilation and condensation.
Research into our new property
In 1986, I attended the Milton Keynes Energy World exhibition which was an exhibition of new build houses with extreme levels of energy efficiency. Many of these houses were of timber frame construction, though a common feature of all of them was mechanical ventilation and heat recovery. I was sold on this concept, and for the next two years, I researched construction techniques and materials with a view to specifying a bungalow that we wanted built. I developed an Excel model of heat loss for our house with ‘U values” for each of the 6 sides of each room in the house with a view to calculating the heat loss.
Bungalow Specification
I decided that our bungalow should be “all electric” and not use gas; I was convinced this was practical, provided it was well insulated, since otherwise running costs would have been prohibitive. To achieve a high level of insulation, the following design specifications were used: thermostatically controlled electric storage heaters; polystyrene insulated floor; 125mm insulating blocks for interior walls; 75mm block/brick cavity filled with mineral wool; double glazed windows with Pilkington “k” glass; foil backed plasterboard; 8” of loft insulation and finally a Flebu mechanical ventilation and heat recovery system fitted in the attic.
Using my Excel model of heat loss, I was able to demonstrate that the bungalow which was 50% larger in terms of sq ft than our earlier dwelling with a 2,100 sq ft slab for accommodation should use no more energy than our earlier new build house because we had gone for insulation standards far in excess of current building regulations.
Flebu mechanical ventilation and heat recovery experience
This unit was placed in the attic and it had flexible aluminium ducting tubing connected to the outside inlet and exhaust vents and vents in all rooms and the cooker hood in the kitchen. The way the system worked was that fresh air was drawn in from outside, and it passed through a cross flow heat exchanger with the air being blown into all living rooms and bedrooms. Meanwhile, stale moist warm air was extracted from the kitchen hob unit, utility room and both bathrooms and this air was exhausted through the heat exchanger to be blown outside. The unit had manual control with four fan speeds.
Inside the heat exchanger, there was a condensate drip tray that was fed outside and in the cold winters, we often saw 1ft long icicles on the overflow.
This ventilation system gave us some considerable benefits: we could shower without opening any bathroom windows, though we would turn the fan speed up on those occasions; draughts were eliminated, and altogether the air felt very fresh within the bungalow.
On two occasions, the ventilation unit failed due to a design fault, and when this happened, we had condensation form on bedroom windows at night and we tended to get sore throats!
Our property is virtually air-tight and has no fireplace and I had proof that the ventilation system eliminated condensation while at the same time eliminating any smells and preventing mustiness.
This Flebu system was a very good investment; it served up well and did an excellent job. However, after 20 years of excellent service, if was due for replacement and I started research on a new system.
Search for a replacement heat recovery system
The Flebu system was old and the flexible aluminium ducting was collapsing in places, and so I researched replacement systems. The summers were getting warmer and ideally, I was looking for a system that could provide cooling in summer and an efficient heat pump to provide low cost heating in winter. Some systems were available with separate heat pump and heat recovery units, while Genvex produced a range one that was in one self-contained unit.
I particularly liked the Genvex unit because: it was all-in-one; it had a heat pump that could provide low cost heat in winter, and when reversed it could provide cooling in the summer. Having downloaded the brochures and studied them, I visited their offices in the UK and had a demonstration of the unit and I was impressed.
The particular attractive feature of the Genvex unit was that it was microprocessor controlled and so had an enormous range of control options that were not only useful, but also extremely desirable. In addition, there were 7 temperature sensors within the unit that monitor inlet, exhaust, room and operating temperatures within the heat pump and heat exchanger.
Genvex mechanical ventilation with heat pump assisted heat recovery system installation
The Genvex importers in the UK were very helpful and professional in their dealings with me and I was fortunate to have a particularly competent and capable engineer who installed our system over 4 days. The key features of this new system were:
- The ducting was rigid galvanised steel tubing that was wider than the original flexible ducting. The effect of having rigid tubing was that greater air flow was possible with lower noise.
- All ducting was insulated with special foil wrapped bubble insulation, and it looked extremely tidy; this was better insulation than we had before.
- Two large silencers were installed by the unit to reduce noise; our system is inaudible when running.
- The unit weighed 100kg, and so I made a 2 metre long load spreading plinth to place it on.
- We had an optional electrostatic filter fitted to further filter and purify the air.
- I opted for a slightly larger unit than the bungalow design suggested I needed to maximise the heat pump heating (in winter) and cooling (in summer), and this proved to be a wise choice.
Installation Photo
.jpg)
In the photo above, the large white box is the ventilation and heat recovery unit. The box also contains the air sourced heat pump. The small white box in front of the large box contains the microprocessor and electronics. The silvery rectangular box at the front is the optional electrostatic filter.
The large 'drums' in line with the pipes are the silencers which eliminate noise transmission into the bungalow. Details and photographs of the installation are on my website www.redoak.co.uk and so I will not repeat anything else here that is on the website, and I would urge you to look there for more details other than show two photographs of the system running in heating and cooling modes.

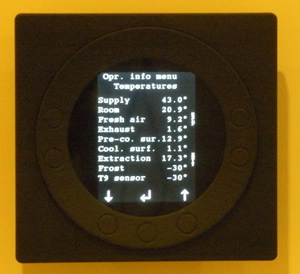
This shows the Optima 300 controller operating in the winter with the air sourced heat pump operating.
Note here that "Fresh Air" is brought in from outside at 9.2C, goes through the cross flow heat exchanger and heat pump and is blown to the rooms at 43C.
Next stale moist air is extracted at 17.3C and again goes through the heat exchanger and heat pump to be blown outside at 1.6C.
Ignore the -30C readings as we do not have those options installed.
Using the heat pump in winter allows us to turn our storage heaters off early. The heat pump uses around 350W, yet it provides the equivalent of 1KW of heat energy.
Heating and Cooling Modes - Cooling
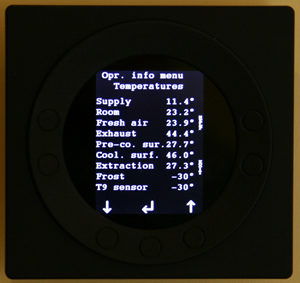
 In summer, the heat pump works in reverse and cools the incoming air while reducing the humidity to making the environment more comfortable. With the recent hot weather, here are details of the heat pump providing cooling.
Note here that "Fresh Air" is brought in from outside at 23.9C, goes through the cross flow heat exchanger and heat pump and is blown to the rooms at 11.4C.
Next stale moist air is extracted at 27.3C and again goes through the heat exchanger and heat pump to be blown outside at 44.4C.
Ignore the -30C readings as we do not have those options installed.
This is not air conditioning, but there is a welcome drop in temperature, and unlike air conditioning, there is no recirculated air.
Experience from running the Genvex mechanical ventilation and heat recovery system
Our system has now been installed for 18 months and has been in operation over two winters. What I’d like to do now is discuss how it has performed and what lessons I have learned.
- Make sure you keep the installation manual that comes with the unit; it is useful.
- The number of options available is significant; I should probably have understood them better before placing my order; so read up on the manuals and make sure you have a good understanding of them before you talk to the Genvex people.
- You should not “spoil a battleship for a half penny of tar”. What I mean is, go for a few extras that you like and may be useful, and do not over-economise. The importers suggested I drop the electrostatic filter off my order to save cost, I am glad I did not!
- The chief benefit is the elimination of condensation and all the problems that go with it.
- The air is without question cleaner and fresher and there is no sense of mustiness, and no draughts.
- Ever since we had the new system installed, my asthma has improved and so has my son’s, so I am convinced there are some tangible medical benefits.
- There are amazing different options on controlling the system; fully reading and understanding the manual is important to get the best out of it.
- When the heat pump is operating in heating mode (in winter), you should be able to turn the heating off earlier than without the heat pump running.
- When the heat pump is operating in cooling mode, it is NOT air conditioning, but it does provide a useful cooling effect in hot weather that is noticeable. Air conditioning is expensive to run; this system is not expensive.
- The heat pump only consumes 350W in either heating or cooling modes, and the benefits far exceeds any running costs.
- There are different principles that can be applied to running the system, particularly in the winter. I’ll discuss these with people individually.
- I believe we are seeing a running cost saving through using this Genvex system, but I am unable to quantify it because the weather is not constant.
Finally, after 18 months use I am very satisfied with the operation of it. If anyone is in the UK and is thinking of having one installed in a new property or having one installed in an existing property, I would be willing to allow a home visit for a small fee to answer any questions and to help you make up your mind on it’s suitability, and for you to see a system running live in a home environment.
I hope that you have found this article useful. You may reach me via email at:
johnperry at redoak dot co dot uk and please visit http://www.redoak.co.uk for a detailed review of the function of the Genvex unit.
John Perry
John Perry
The content & opinions in this article are the author’s and do not necessarily represent the views of AltEnergyMag
Comments (0)
This post does not have any comments. Be the first to leave a comment below.
Featured Product

U.S. BATTERY RENEWABLE ENERGY SERIES DEEP CYCLE BATTERIES
Our RE Series batteries are designed to provide the highest peak capacity, longest cycle life, and greatest reliability for use in industrial or residential renewable energy applications. Renewable Energy Series batteries utilize the company's exclusive XC2™ formulation and Diamond Plate Technology® to create the industry's most efficient battery plates, delivering greater watt-hours per liter and watt-hours per kilogram than any other flooded lead-acid battery in the market. Our Deep Cycle batteries are engineered to work with solar panels as well as other renewable energy applications.
